Tutorials
Example
This tutorial walks through a simple example usage of p3.
Obtain a BIDS dataset. You can convert your own data or use one of the shared BIDS dataset on OpenNeuro. In this tutorial, we use the MSC dataset.
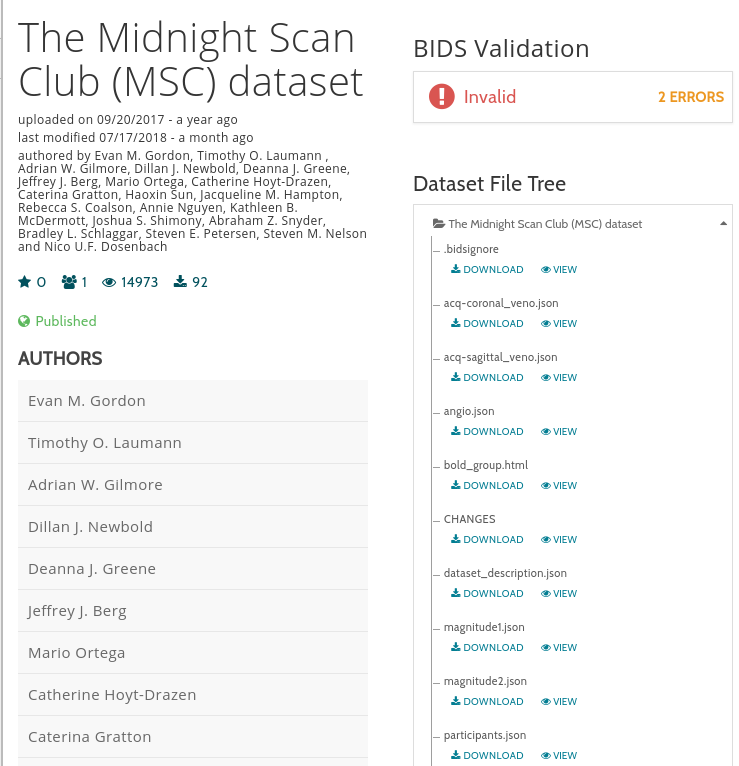
The BIDS version of the MSC dataset.
Download the p3 Docker Image/Singularity Image.
# Docker
docker pull p3proc/p3:latest

# Verify that the image is installed
docker images

REPOSITORY          TAG                  IMAGE ID            CREATED             SIZE
p3proc/p3           latest               6c8204e4f40f        XX hours ago        17.1GB
p3proc/p3base       0.1                  59c60216e586        XX hours ago        16.6GB

# OR

# Singularity (This will create a .simg file in your current directory)
singularity pull shub://p3proc/p3:latest
In this example, my bids dataset is located in ~/MSC_BIDS. I want my output files to go into ~/output.
But first, let’s store a reference to the ~ directory.
# change to home
cd ~
# this stores the home directory as an absolute path in ${HOMEPATH}
export HOMEPATH=$(pwd -P)
Now let’s mount the volumes on to the docker container. The -v falg lets you mount host volumes to the docker container, while the -B flag mounts the host volumes for a singularity container. We’ll mount the BIDS dataset to /dataset and the output directory to the /output directory on the container. (Note that docker needs absolute paths).
# run the p3 docker with mounts and not arguments
docker run -it --rm \ # This is the standard docker run command
    -v ${HOMEPATH}/MSC_BIDS:/dataset:ro \ # this mounts the BIDS data as read-only
    -v ${HOMEPATH}/output:/output \ # mount the output directory
    p3proc/p3

# OR

# run the p3 singularity image
singularity run \ # singularity run command
    -B ${HOMEPATH}/MSC_BIDS:/dataset:ro \ # this mounts the BIDS data as read-only
    -B ${HOMEPATH}/output:/output \ # mount the output directory
    p3proc_p3.simg
You should see this output, since we didn’t pass any arguments…
usage: p3proc [-h]
      [--participant_label PARTICIPANT_LABEL [PARTICIPANT_LABEL ...]]
      [--skip_bids_validator] [-v] [-s SETTINGS]
      [-g GENERATE_SETTINGS] [--summary] [--disable_run]
      [-w WORKFLOWS [WORKFLOWS ...]] [-c CREATE_NEW_WORKFLOW] [-m]
      [-d]
      [bids_dir] [output_dir] [{participant,group}]
p3proc: error: positional arguments bids_dir/output_dir are required.
If you didn’t see this exact message. Check for mispellings in your command.
Note
Docker/singularity mounts are automatically created, even if they don’t exist. This means you can use any names for the container path.
# use a custom path

# Docker
docker run -it --rm \
    -v ${HOMEPATH}/mydir:/custompath # This mounts ~/mydir to /custompath
    p3proc/p3

# Singularity
singularity run \
    -B ${HOMEPATH}/mydir:/custompath # This mounts ~/mydir to /custompath
    p3proc_p3.simg
Next, let’s generate a settings file. We need to create a settings folder to mount.
# and store out settings file
mkdir ~/mysettings
Now generate the settings file, mounting our newly created settings folder.
# Generate the settings file,
docker run -it --rm \
    -v ${HOMEPATH}/mysettings:/settings \
    p3proc -g /settings/newsettings.json

# Singularity
singularity run \
    -B ${HOMEPATH}/mysettings:/settings \
    p3proc_p3.simg -g /settings/newsettings.json
This will generate a settings file called newsettings.json. Since we mounted our mysettings folder to the ./settings folder on the container, the newsettings.json file should exist there.
The newsettings.json file can be modified with any text editor. See the Settings section for more details on each option.
Finally, let’s run the pipeline. The most basic command provides a BIDS directory and an output directory.
# Run the most basic pipeline command
docker run -it --rm \
    -v ${HOMEPATH}/MSC_BIDS:/dataset:ro \
    -v ${HOMEPATH}/output:/output \
    p3proc/p3 /dataset /output # we use the container paths for the dataset/output

# Singularity
singularity run \
    -B ${HOMEPATH}/MSC_BIDS:/dataset:ro \
    -B ${HOMEPATH}/output:/output \
    p3proc_p3.simg /dataset /output # we use the container paths for the dataset/output
This will run the internally set default settings. If we want to use our settings file generated in step 5. We’ll need to mount our mysettings folder and add the settings argument to the execution call.
# Run with settings
docker run -it --rm \
    -v ${HOMEPATH}/MSC_BIDS:/dataset:ro \
    -v ${HOMEPATH}/output:/output \
    -v ${HOMEPATH}/mysettings:/settings \ # mount our settings folder
    p3proc/p3 /dataset /output -s settings/newsettings.json # add the settings argument

# Singularity
singularity run \
    -B ${HOMEPATH}/MSC_BIDS:/dataset:ro \
    -B ${HOMEPATH}/output:/output \
    -B ${HOMEPATH}/mysettings:/settings \ # mount our settings folder
    p3proc_p3.simg /dataset /output -s settings/newsettings.json # add the settings argument
This will run the pipeline with the specified settings.
That’s it! You’ve run the p3 pipeline successfully!
Creating New Workflows
The main feature of p3 is to be able to create new workflows and integrate them into your pipeline seamlessly. This tutorial will show you how to do just that.
Create a folder to store your workflows. We’ll import this folder later when we want to include our customworkflowworkflow.
# Here we create a folder called myworkflows in the home directory
mkdir ~/myworkflows
cd ~/myworkflows
touch __init__.py # The generates an __init__.py file, which makes this folder importable
Create a new workflow with the –create_new_workflow option.
# We create a new workflow called "customworkflow";
p3proc --create_new_workflow customworkflow
This will generate a folder called customworkflow in the myworkflows directory. Inside the customworkflow folder should be 4 files:
- __init__.py
makes the workflow importable
- custom.py
stores custom functions for use with a Function Interface
- nodedefs.py
defines nodes of the workflow
- workflow.py
defines the node connections of the workflow and it is what p3 imports
Set inputs and outputs to your workflow.
In order for our workflow to integrate with the rest of the pipeline, it must have input and output fields defined to communicate with other workflows. This is done with the set_input and set_output methods in the nodedefs.py file. In this example, let’s assume we want to do a simple skullstrip of our T1. So our input expects a T1 image and the output will be a skullstripped T1 image.
""" nodedefs.py """

from p3.base import basenodedefs
from .custom import *

class definednodes(basenodedefs):
    """
        Initialize nodes here
    """

    def __init__(self,settings):
        # call base constructor
        super().__init__(settings)

        # define input/output nodes
        self.set_input([
            'T1' # we set this to be a T1 image
        ])
        self.set_output([
            'skullstripped_T1' # we set this to be a skullstripped image
        ])
Both the set_input and set_output methods accept a list as an argument. So you can specify multiple input/ output fields with a list.
Create a node with an interface.
For our workflow to do something we need to define a node. In p3, nodes are all defined in the nodedefs.py file and imported into workflow.py. These nodes are the same nodes used in nipype, so all of the interfaces that nipype uses, p3 can use as well.
Continuing with our example let’s use FSL’s skullstrip in our workflow. To do this we create a node and apply the fsl.BET interface to it (Don’t forget the import statement at the top!).
""" nodedefs.py """

from p3.base import basenodedefs
from .custom import *
from nipype.interfaces import fsl # DON'T FORGET ME OuO!

class definednodes(basenodedefs):
    """
        Initialize nodes here
    """

    def __init__(self,settings):
        # call base constructor
        super().__init__(settings)

        # define input/output nodes
        self.set_input([
            'T1' # we set this to be a T1 image
        ])
        self.set_output([
            'skullstripped_T1' # we set this to be a skullstripped image
        ])

        # Define our fsl skullstrip node
        self.fsl_skullstrip = Node(
            fsl.BET(), # we use the fsl BET interface
            name='fsl_skullstrip' # this names the node
        )
You can read more about nodes and interfaces at the nipype documentation.
Connect the nodes together.
Now we need to connect our workflow’s nodes together. This will tell the workflow how data should be passed from node to node. In our example, we want our workflow the “T1” image from the input to be passed to the “skullstripped_T1” output. This is done in the workflow.py file.
""" workflow.py """

from nipype import Workflow
from .nodedefs import definednodes
from p3.base import workflowgenerator

class newworkflow(workflowgenerator):
    """ newworkflow

        Description goes here

    """

    def __new__(cls,name,settings):
        # call base constructor
        super().__new__(cls,name,settings)

        # create node definitions from settings
        dn = definednodes(settings)

        # connect the workflow
        cls.workflow.connect([
            # node connections go here
        ])

        # return workflow
        return cls.workflow
Let’s add in the connections.
""" workflow.py """

from nipype import Workflow
from .nodedefs import definednodes
from p3.base import workflowgenerator

class newworkflow(workflowgenerator):
    """ newworkflow

        Description goes here

    """

    def __new__(cls,name,settings):
        # call base constructor
        super().__new__(cls,name,settings)

        # create node definitions from settings
        dn = definednodes(settings)

        # connect the workflow
        cls.workflow.connect([
            (dn.inputnode,dn.fsl_skullstrip,[
                ('T1','in_file') # this sets the T1 field or our input to the in_file of the BET interface
            ]),
            (dn.inputnode,dn.fsl_skullstrip,[
                ('out_file','skullstripped_T1') # this sets the out_file of the BET interface to the skullstripped_T1 of our output
            ])
        ])

        # return workflow
        return cls.workflow
Our simple skullstrip workflow is now ready for use!
Import the workflow and register the connections in the settings file.
First, create a settings file.
# This is for native install, use mounts if using docker/singularity
p3proc -g settings.json
Now we need to edit our settings file to include our new workflow.
# Under the "workflows" key of settings.json
"workflows": [
    "p3_bidsselector",
    "p3_freesurfer",
    "p3_skullstrip",
    "p3_stcdespikemoco",
    "p3_fieldmapcorrection",
    "p3_alignanattoatlas",
    "p3_alignfunctoanat",
    "p3_alignfunctoatlas",
    "p3_create_fs_masks",
    "customworkflow" # This uses the workflow's folder name!
],
To connect it to other workflows, we use the “connection” key of settings.json.
"connections": [
    {
        "source": "p3_bidsselector",
        "destination": "customworkflow",
        "links": [
            [
                "output.anat",
                "input.T1" # this is the T1 input in our custom workflow
            ]
        ]
    },
    {
        "source": "customworkflow",
        "destination": "p3_alignanattoatlas",
        "links": [
            [
                "output.skullstripped_T1", # this is our skullstripped T1 output
                "input.T1_skullstrip"
            ]
        ]
    },
    ...
]
Run p3 with the new workflow.
Now we can run p3 with the new workflow we’ve incoporated. To do this use the settings file and specify the workflows directory that we made in step 1.
# run p3
p3proc ~/dataset ~/output -w ~/myworkflows -s settings.json
This will run your pipeline with the your custom workflow.
Sideloading
Sideloading is a unique feature of p3 that allows a user to manually substitute any input to any node in any workflow. This is useful in cases where the output of any step has failed/is undesirable, and needs to be manually adjusted before continuing further steps of the pipeline. Sideloading is accomplished by editing the sideload key in the settings file.
Identify the node you want to replace an input field for.
In this tutorial, we are replacing the skullstrip output with one of our own files.
We will replace the T1_skullstrip field of the output node of the p3_skullstrip workflow with a skullstrip file that I’ve manually made at ~/skullstrip_edit/T1_skullstrip.nii.gz.
Generate a settings file.
# generate a settings file
p3proc -g settings.json
In the settings file, edit the sideload key.
# We are replacing the T1_skullstrip field of the output node of the
# p3_skullstrip workflow
"sideload": [
    {
        "workflow": "p3_skullstrip",
        "node": "output",
        "input": ["T1_skullstrip", "~/skullstrip_edit/T1_skullstrip.nii.gz"] # we specify the path of our skullstrip edit
    }, # This is a list, so the comma allows you
       # to specify extra sideload entries here
]
Note
If you are using Docker/Singularity, be aware that any path you specify is relative to the container, not the host. So if ~/skullstrip_edit is mounted to /myedits, use the path /myedits/T1_skullstrip.nii.gz instead.
Note
MAKE SURE YOU SAVE THE SETTINGS FILE!!! OuO!
Run the pipeline.
If you sideloaded the node correctly, you should see this in the p3 output.
# You should see me OuO!

Disconnect: ('biasfieldcorrect', 'output_image', 'output', 'T1_skullstrip')

Sideload Status for node p3_skullstrip.output:

T1_skullstrip = ~/skullstrip_edit/T1_skullstrip.nii.gz
allineate_freesurfer2anat = <undefined>
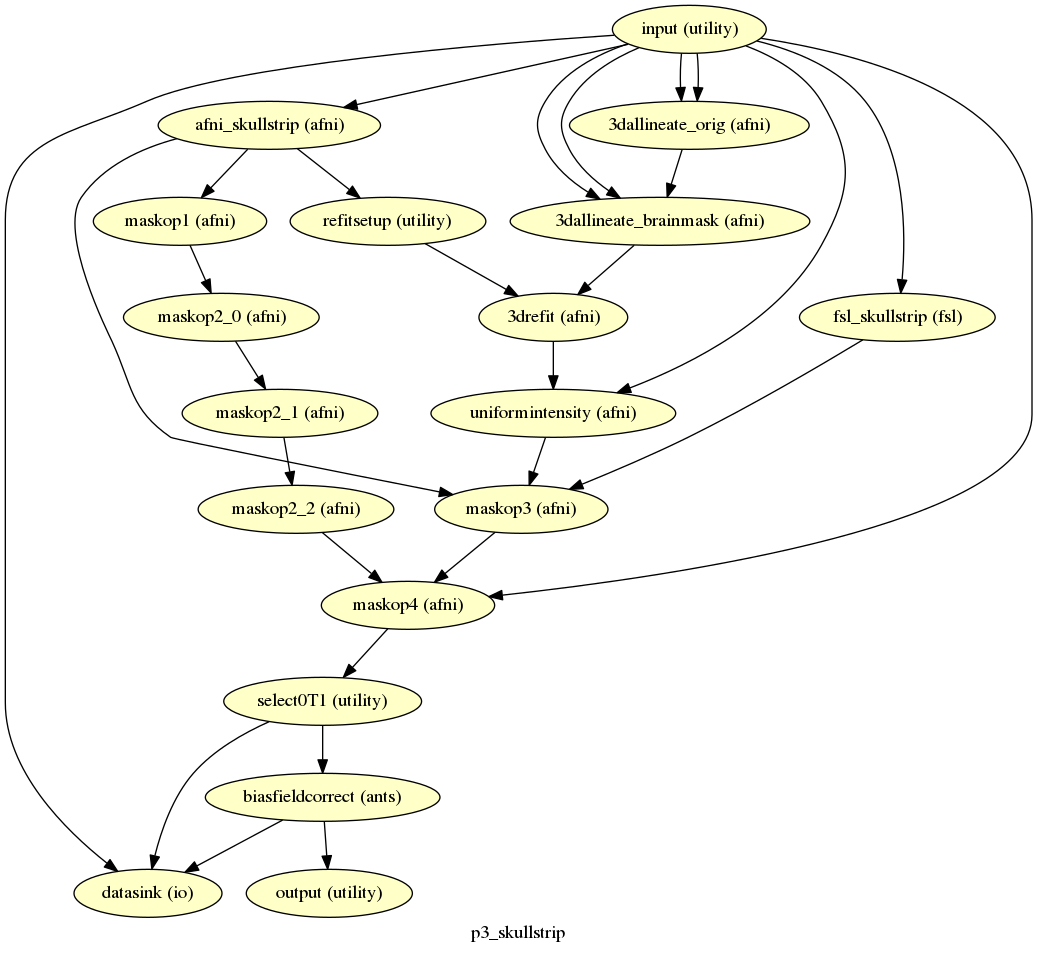
And the graph of the workflow should reflect this change by disconnecting the node from the original node it was connected to.
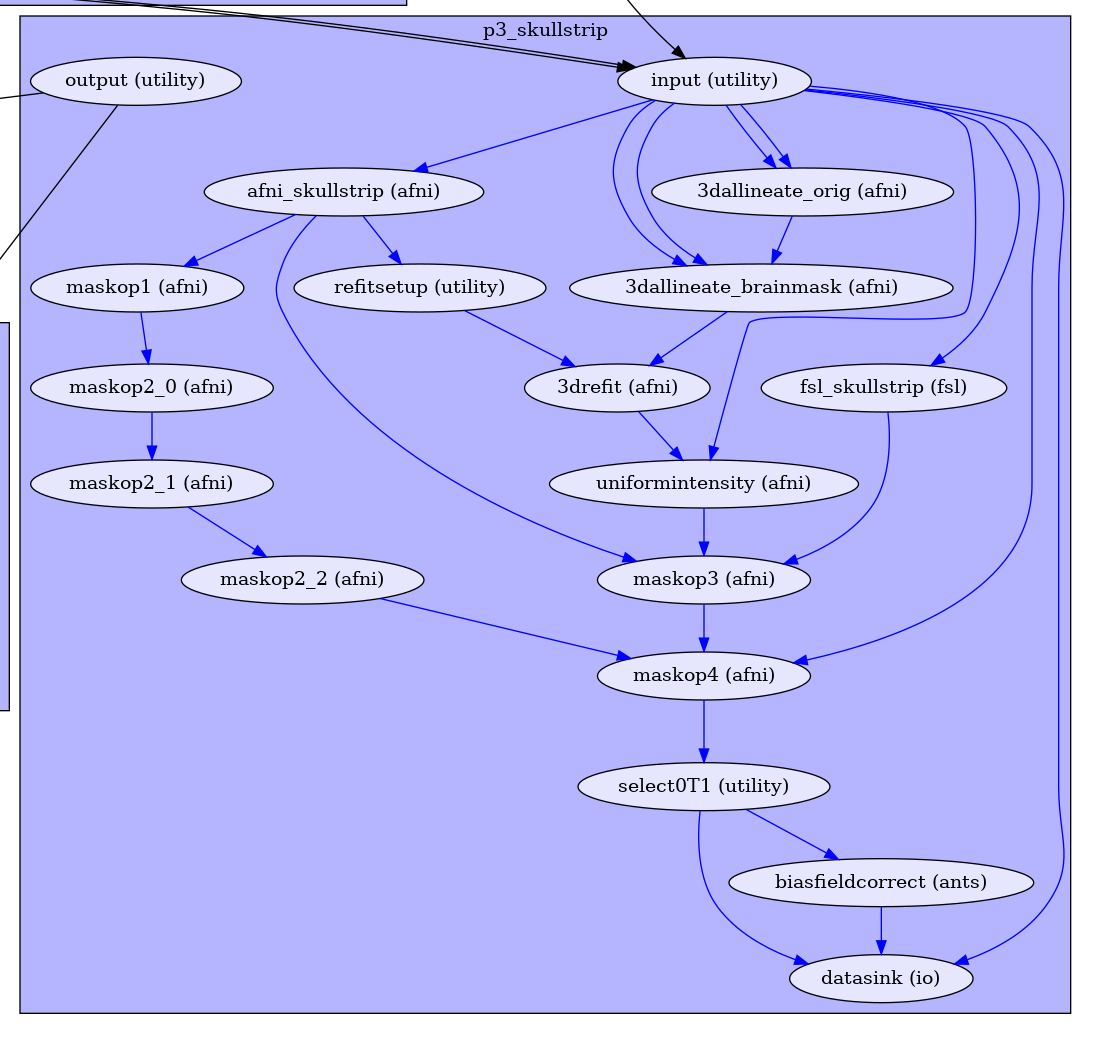
biasfieldcorrect has been disconnected from the output.